

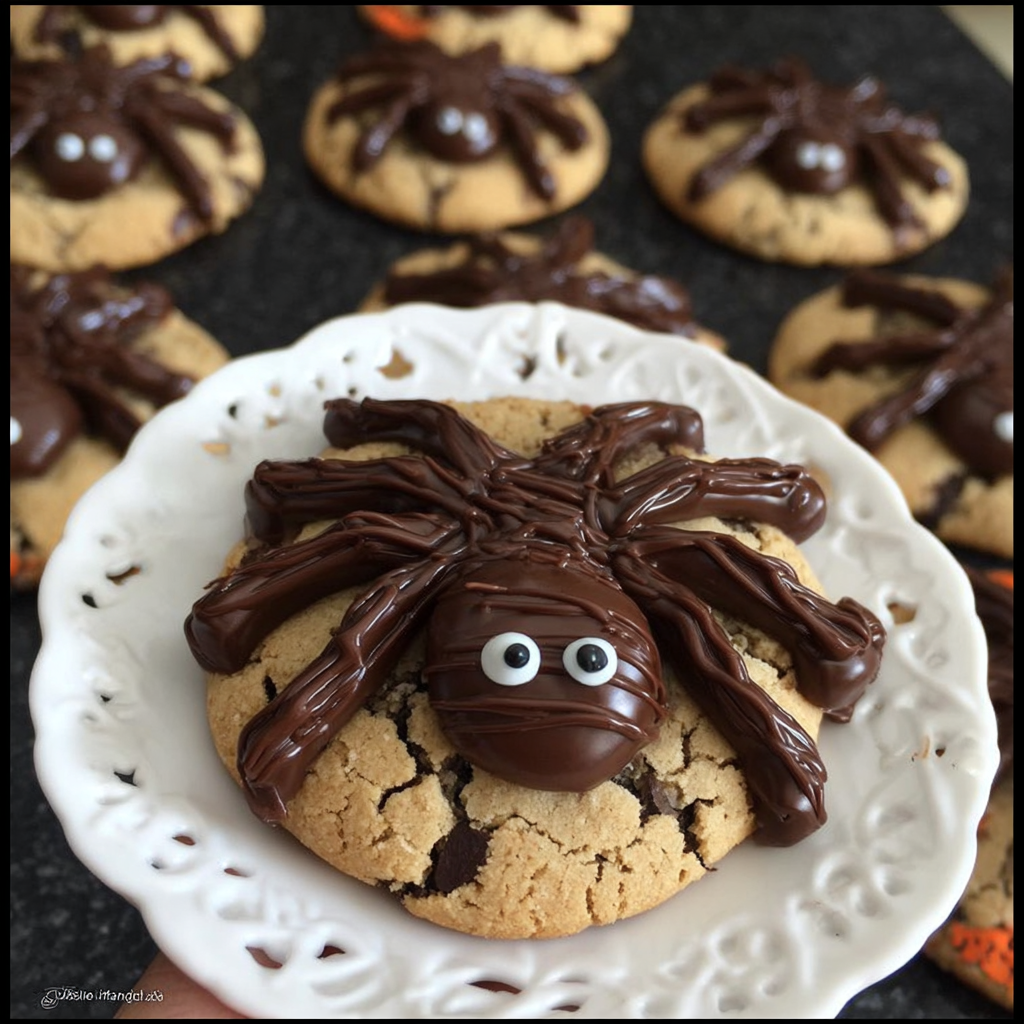
Spider Chocolate Cookies: The Ultimate Halloween Treat
Spider Chocolate Cookies are the perfect mix of spooky and sweet, making them a must-bake treat for Halloween parties and family gatherings. These chewy, chocolatey cookies get a festive upgrade with candy eyes, piped chocolate legs, or gooey marshmallow webs that transform them into edible works of art. Fun to make with kids yet impressive enough for adults, they’re the ultimate Halloween dessert that’s both playful and delicious. Check out this Pumpkin Smores Cookies
What Are Spider Chocolate Cookies?
Spider Chocolate Cookies are festive Halloween cookies designed to look creepy yet fun, combining a rich chocolate base with creative decorations. Instead of plain drop cookies, bakers add spooky details such as melted chocolate chip spiders, mini peanut butter cup bodies, or stretched marshmallow webs. Some versions keep it simple by dragging melted chips into thin legs, while others go all out with candy eyes and dramatic white-chocolate webbing. The goal is to transform an ordinary cookie into a Halloween showstopper that kids love to decorate and adults enjoy serving at parties. Whether you prefer subtle designs or bold candy spiders, these cookies balance delicious flavor with eye-catching presentation, making them a seasonal favorite every October
Styles You’ll See Online
If you search for these cookies, you’ll notice three distinct styles:
- Chocolate-chip “chip spiders” – Baked chocolate-chip cookies where melted chips are dragged outward to form legs.
- Peanut butter cup spiders – A PB cup pressed into the cookie center, piped legs, and candy eyes.
- Marshmallow spider webs – Melted marshmallows stretched across cookies for a gooey, creepy effect.
Each has its own charm — chip spiders are the quickest, PB cup versions feel most festive, and marshmallow webs have dramatic visual appeal.
Ingredients & Substitutions
Base Cookie
- Cocoa powder (Dutch-process or black cocoa for deep color).
- Butter or neutral oil for richness.
- Brown sugar for chewiness.
- Baking soda (spread) or baking powder (lift).
Decorations
- Chocolate chips or chunks for bodies and legs.
- Mini peanut butter cups, Rolos, or Milk Duds for spider bodies.
- Candy eyes for spooky realism.
- White chocolate or mini marshmallows for webs.
Dietary Swaps
- Gluten-free flour blends for celiac-friendly baking.
- Vegan butter and dairy-free chocolate for dairy-free diets.
- Aquafaba or flax eggs for egg-free versions.
- Sunflower seed butter cups instead of peanut butter cups for nut-free classrooms.
Tools & Equipment
Making Spider Chocolate Cookies doesn’t require professional gear, but having the right tools makes the process easier and more fun. A sturdy baking sheet lined with parchment or a silicone mat ensures even baking, while a cookie scoop keeps cookies uniform in size. Use mixing bowls, a hand or stand mixer, and measuring cups/spoons for accuracy. For decorating, prepare piping bags (or zip-top bags with a snipped corner), toothpicks for detailing legs, and a cooling rack to let cookies set properly before serving.
Step-by-Step: Classic Chocolate-Chip “Spider” Method
The classic version of Spider Chocolate Cookies starts with a simple chocolate-chip cookie base, transformed into spooky spiders with a few easy decorating steps. Here’s how to do it:
- Prepare the dough – Cream together butter, sugars, and vanilla until light and fluffy. Beat in eggs, then add flour, cocoa, baking soda, and salt. Fold in chocolate chips. For better shape and less spreading, chill the dough for 20–30 minutes.
- Scoop and bake – Use a cookie scoop to portion the dough onto a lined baking sheet. Bake at 350°F (175°C) until the edges are set but the centers remain soft, usually 9–11 minutes depending on size.
- Spot spider bodies – While cookies are still warm, identify the visible chocolate chips on top that will serve as spider bodies.
- Pipe the legs – Melt extra chocolate chips in a microwave-safe bowl, transfer to a piping bag, and draw three to four legs extending outward from each “body.” For realistic detail, drag a toothpick through the chocolate to taper the ends.
- Add spooky details – Attach candy eyes with a dab of melted chocolate or place a mini candy like a malt ball or peanut butter cup over a chip to create a larger spider body.
- Set and serve – Allow cookies to cool fully so the chocolate decorations firm up.
The result is a tray of chewy, chocolatey cookies topped with spiders that look spooky but taste irresistibly sweet. Perfect for Halloween parties or baking fun with kids!
PB-Cup Spider Cookies
For a bolder spider effect:
- Bake simple chocolate or peanut butter cookies.
- While warm, press a mini PB cup into the center.
- Pipe out chocolate legs from the body.
- Add candy eyes using melted chocolate as adhesive.
These cookies are ideal for Halloween parties and bake sales.
Spider Web Cookies with Marshmallow or White Chocolate
Want drama on your cookie platter? Try webs:
- Melt mini marshmallows in the microwave until gooey.
- Use oiled fingers to pull strands across cookies in a web pattern.
- Alternatively, pipe melted white chocolate in circular patterns and drag lines outward with a toothpick for a spiderweb look.
Marshmallow webs are stickier and best served fresh, while white-chocolate webs store longer.
Print
Spider Chocolate Cookies
- Total Time: 30 minutes
- Yield: About 24 cookies
- Diet: Vegetarian
Description
| Spider Chocolate Cookies are chewy chocolate treats decorated with piped chocolate legs, candy eyes, or gooey marshmallow webs. Perfect for Halloween parties and kid-friendly baking fun. |
Ingredients
– All-purpose flour
– Cocoa powder (regular or black)
– Baking soda/powder
– Unsalted butter (or dairy-free alternative)
– White & brown sugar
– Eggs (or flax egg substitute)
– Vanilla extract
– Chocolate chips/chunks
– Mini peanut butter cups, Rolos, or Milk Duds
– Candy eyes
– Marshmallows or white chocolate (for webs)
Instructions
1. Prepare cookie dough by creaming butter, sugars, and vanilla; add eggs, then dry ingredients. Fold in chocolate chips.
2. Chill dough briefly, scoop, and bake at 350°F (175°C) until edges are set.
3. While warm, press PB cups or identify chocolate chips as spider bodies.
4. Pipe melted chocolate legs and attach candy eyes.
5. For webs, stretch melted marshmallows or pipe white chocolate designs.
6. Let cool until decorations set.
Notes
| – Chill dough for thicker cookies. – Work quickly with marshmallow webs. – Dark cocoa or espresso powder enhances flavor. – Use melted chocolate as “glue” for candy eyes. – Nut-free, gluten-free, and vegan substitutions available. |
- Prep Time: 20 minutes
- Cook Time: 10 minutes
- Category: Dessert
- Method: Baking
- Cuisine: American
Nutrition
- Calories: 320
- Sugar: 28g
- Sodium: 180mg
- Fat: 16g
- Saturated Fat: 9g
- Carbohydrates: 42g
- Fiber: 2g
- Protein: 4g
Flavor Boosters & Variations
One of the best things about Spider Chocolate Cookies is how customizable they are. Beyond the classic version, you can boost flavor and get creative with festive twists to suit your taste or occasion.
Intensify the Chocolate
- Use Dutch-process cocoa or black cocoa for a richer, darker base that looks extra spooky.
- Add espresso powder to deepen chocolate flavor without making the cookies taste like coffee.
- Fold in chunks of dark chocolate for gooey pockets of intensity.
Candy Body Swaps
- Replace peanut butter cups with Rolos, Milk Duds, or malt balls for fun variety.
- Try small truffles or chocolate-covered caramels as dramatic spider bodies.
Seasonal Twists
- Dust cookies lightly with pumpkin spice sugar for a cozy fall flavor.
- Drizzle orange-tinted white chocolate for a festive Halloween look.
- Add cinnamon or nutmeg to the dough for subtle warmth.
Allergen-Friendly Options
- Use gluten-free flour blends for celiac-friendly cookies.
- Swap butter for vegan margarine and use dairy-free chocolate for lactose-free baking.
- Choose seed-butter cups instead of peanut butter for nut-free classrooms.
With these variations, you can make your Spider Chocolate Cookies darker, richer, more festive, or more inclusive — ensuring everyone has a chance to enjoy a spooky-sweet Halloween treat. Whether you go for intense chocolate, playful candy swaps, or allergy-conscious alternatives, these cookies will always spin a web of flavor and fun.
Pro Decorating Tips
- Keep melted chocolate warm but not runny to avoid blobs.
- Use a fine piping tip or snip the very corner of a bag for thin lines.
- Chill cookies briefly after piping for neat, set legs.
- For marshmallow webs, oil your fingers and work in small batches.
- Press PB cups gently so cookies don’t crack.
Troubleshooting
Even the best bakers sometimes face hiccups when making Spider Chocolate Cookies. Here are common problems and simple fixes to keep your cookies looking spooky and delicious:
- Legs spreading or blobbing – If the chocolate legs lose their shape, the cookies may still be too warm or the melted chocolate is overheated. Let cookies cool slightly and allow chocolate to thicken before piping.
- Webs collapsing or sticking – Over-melted marshmallows turn runny instead of stretchy. Melt in short bursts and work in small batches, or switch to melted white chocolate for more stability.
- Cookies spreading too much – Warm dough can lead to flat cookies. Chill the dough for 20–30 minutes before baking, and double-check that your baking soda or powder is fresh.
- Candy eyes falling off – If decorations won’t stick, use a dab of melted chocolate as glue and let them set fully before storing.
- Too sweet for your taste – Darken the flavor with Dutch-process or black cocoa, and finish with a sprinkle of flaky salt to balance the sweetness.
Storage & Make-Ahead
- Store decorated cookies airtight for 3–4 days.
- Marshmallow-web cookies taste best the same day.
- Freeze plain, undecorated cookie bases for up to 3 months. Decorate after thawing.
Food Safety & Allergens
Always label if cookies contain nuts, dairy, or eggs, especially for school events. When baking with kids, handle raw eggs safely (see USDA egg-safety link above).
Nutrition Snapshot
Calories vary by cookie size and decoration. On average, a large decorated cookie may contain 300–430 calories, with higher counts if using PB cups or Rolos.
Styling & Presentation
- Arrange cookies on a black serving tray or spiderweb-patterned platter.
- Mix spider and web cookies for variety.
- Add fake spiders or cobweb decorations around the platter for Halloween parties.
FAQs About Spider Chocolate Cookies ?
How do you make chocolate-chip spiders on cookies?
Bake cookies with visible chips, then pipe chocolate legs while still warm. Taper ends with a toothpick.
What candy makes the best spider body?
Mini peanut butter cups are most popular, but Rolos, Milk Duds, and malt balls also work well.
Can I use marshmallows to make spider webs?
Yes! Melt marshmallows and stretch into strands, or use white chocolate for a cleaner effect.
Do I have to chill the dough?
Not always, but chilling helps prevent overspread and gives cookies a better shape.
How long do decorated cookies keep?
Most last 3–4 days airtight. Marshmallow webs are best within 24 hours.
How do I get jet-black cookies without food dye?
Use black cocoa powder in the base.
Conclusion to Spider Chocolate Cookies
Spider Chocolate Cookies are more than just a Halloween novelty — they’re a delicious and creative way to showcase your baking skills. With variations ranging from PB-cup spiders to marshmallow webs, you can tailor these cookies for any occasion. The real magic lies in the details: glossy piped legs, playful candy eyes, and dramatic webs that will wow both kids and adults. Discover these fun Halloween party food inspiration
Beyond their festive looks, these cookies are also customizable — swap in gluten-free flour, go dairy-free, or experiment with dark chocolate for a richer bite. They store well, can be made ahead, and make an unforgettable addition to any Halloween spread.
So grab your piping bag, melt some chocolate, and get creative — your next batch of Spider Chocolate Cookies is sure to spin a web of compliments! 🕷️🍪