
Halloween baking is always more fun when your desserts look as good as they taste, and these Ghost Brownies are a perfect example. Rich, fudgy chocolate brownies are topped with adorable little white chocolate ghosts, creating a festive dessert that’s easy enough for beginners and impressive enough for parties.
These brownies have everything you want from a classic chocolate dessert: a deep cocoa flavor, soft and fudgy centers, slightly crisp edges, and a rich chocolate texture. The cute ghost decorations add a sweet Halloween touch without requiring complicated decorating skills.
The best part about making Ghost Brownies is how simple the decorating process can be. You don’t need professional baking equipment or advanced piping techniques. With melted white chocolate, a piping bag or small zip-top bag, and a little creativity, you can turn ordinary brownies into spooky Halloween treats.
They’re perfect for Halloween parties, school celebrations, movie nights, bake sales, family gatherings, or simply making something fun with kids during the fall season.
Table of Contents
Why You’ll Love These Ghost Brownies
There are plenty of reasons to make these Ghost Brownies for Halloween.
Rich and Fudgy
The brownie base is soft and chocolatey with a deliciously fudgy center.
Easy Halloween Decoration
The ghost toppings are simple enough for beginner bakers.
Perfect for Parties
Cut the brownies into small squares and arrange them on a platter for an easy Halloween dessert.
Kid-Friendly
Kids can help decorate the ghosts with chocolate eyes and tiny expressions.
Make-Ahead Friendly
The brownies can be baked ahead of time and decorated later.
Fun and Festive
The combination of dark chocolate brownies and bright white ghost decorations creates an instantly recognizable Halloween dessert.
What Are Ghost Brownies?
Ghost Brownies are chocolate brownies decorated to look like little ghosts.
The brownie base can be made with cocoa powder, melted chocolate, or a combination of both. After baking and cooling, the brownies are cut into individual pieces and topped with white chocolate or vanilla icing shaped into ghost figures.
Small chocolate chips, melted dark chocolate, or edible decorating gel can be used to create the ghost eyes and mouths.
The result is a simple Halloween dessert that combines a classic brownie with a fun seasonal design.
For another fun pumpkin dessert, try our Pumpkin Donuts With Maple Glaze.
You can make the ghosts large and simple or add multiple tiny ghosts to each brownie. The style is completely customizable.
For another classic brownie technique, see this brownie baking guide from King Arthur Baking.
Ingredients for Ghost Brownies
You don’t need complicated ingredients to make these Halloween brownies.
For the Brownies
All-Purpose Flour
Flour provides the structure needed for the brownie batter.
Unsweetened Cocoa Powder
Cocoa powder gives the brownies their rich chocolate flavor and dark color.
Granulated Sugar
Sugar adds sweetness and helps create the shiny, delicate crust that many people love on brownies.
Brown Sugar
Brown sugar adds moisture and a deeper caramel-like flavor.
Unsalted Butter
Butter adds richness and helps create a soft, fudgy texture.
Eggs
Eggs provide structure and help keep the brownies rich.
Vanilla Extract
Vanilla enhances the chocolate flavor.
Salt
A little salt balances the sweetness and makes the chocolate taste more intense.
Chocolate Chips
Chocolate chips are optional but can make the brownies extra rich and gooey.
For the Ghost Decorations
White Chocolate
Melted white chocolate works beautifully for making ghost shapes.
Powdered Sugar
If you prefer icing instead of white chocolate, powdered sugar can be used as a base for a simple white glaze.
Vanilla
A little vanilla adds flavor to the decoration if you’re making an icing.
Dark Chocolate
Dark chocolate or melted semi-sweet chocolate creates the ghost’s eyes and mouth.
You can also use edible black decorating gel.
How to Make Ghost Brownies
Making these Ghost Brownies is easy and doesn’t require special baking skills.
Step 1: Preheat the Oven
Preheat your oven to 350°F (175°C).
Line an 8-by-8-inch or 9-by-9-inch square baking pan with parchment paper.
Leave a little parchment hanging over the sides to make the brownies easier to remove later.
Step 2: Melt the Butter
Melt the butter in a saucepan or microwave-safe bowl.
Allow it to cool slightly before adding the other ingredients.
Step 3: Mix the Sugars and Butter
Add granulated sugar and brown sugar to the melted butter.
Whisk until smooth.
Step 4: Add the Eggs
Add the eggs one at a time, whisking well after each addition.
Add the vanilla extract.
The mixture should look smooth and glossy.
Step 5: Add the Dry Ingredients
In a separate bowl, whisk together:
- Flour
- Cocoa powder
- Salt
Gradually add the dry ingredients to the wet mixture.
Stir gently until just combined.
Avoid overmixing the batter.
Step 6: Add Chocolate Chips
Fold in chocolate chips if you’re using them.
Save a few for adding to the top if desired.
Step 7: Transfer to the Pan
Pour the brownie batter into the prepared baking pan.
Smooth the top with a spatula.
Step 8: Bake
Bake for approximately 22 to 28 minutes.
The center should look set but still slightly soft.
A toothpick inserted into the center should come out with a few moist crumbs.
Don’t overbake if you want fudgy brownies.
Step 9: Cool Completely
Allow the brownies to cool completely in the pan.
This step is important because warm brownies can be difficult to decorate and cut cleanly.
Once cooled, lift them out using the parchment paper.
How to Make the Ghost Topping
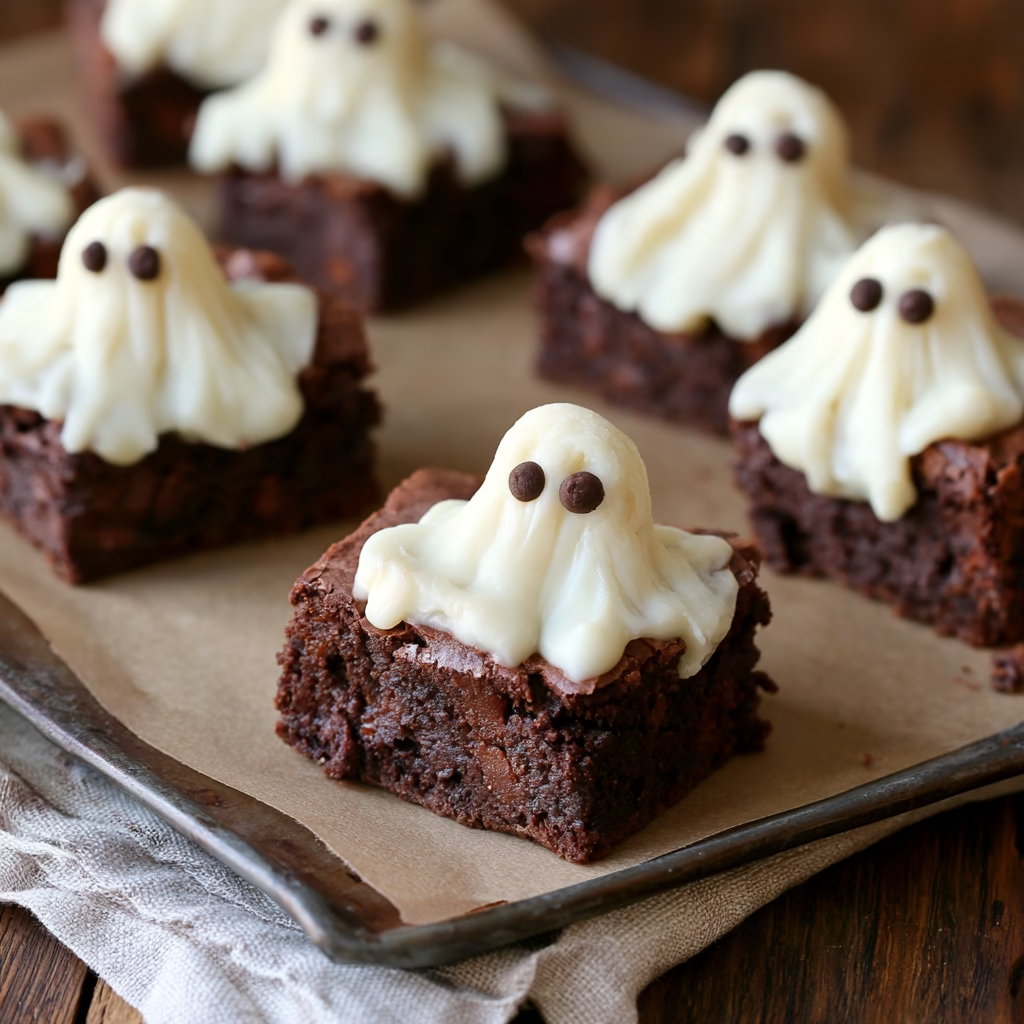
The ghost decoration is the most fun part of these Ghost Brownies.
Option 1: White Chocolate Ghosts
Melt white chocolate slowly in the microwave in short intervals.
Stir between each interval until smooth.
Transfer the melted chocolate into a piping bag or small zip-top bag.
Cut a tiny opening at the tip.
Pipe small ghost shapes onto parchment paper.
Start with a wider base, then move upward while gently squeezing the bag.
Finish with a small rounded head.
Let the ghosts set completely.
Option 2: White Icing Ghosts
You can also make the ghosts directly on top of the brownies using thick white icing.
Pipe small ghost shapes onto each brownie.
This method is especially easy for kids.
Option 3: Marshmallow Ghosts
For an even simpler decoration, place small marshmallows on top of the cooled brownies and cover them with melted white chocolate or icing.
How to Decorate the Ghosts
Once the white ghost shapes are ready, it’s time to give them faces.
Melt a small amount of dark chocolate.
Use a toothpick, piping bag, or tiny decorating tool to add:
- Two small eyes
- A tiny mouth
Don’t worry about making every ghost identical.
Different expressions can actually make the brownies look more playful.
You can create:
- Happy ghosts
- Surprised ghosts
- Scared ghosts
- Sleepy ghosts
This makes decorating especially fun for children.
Tips for Perfect Ghost Brownies
A few simple techniques will help you make the best Ghost Brownies.
Don’t Overbake the Brownies
The most important tip for fudgy brownies is avoiding overbaking.
The center should still have a few moist crumbs when tested.
Cool Completely Before Decorating
Warm brownies can cause the white chocolate or icing to melt.
Wait until the brownies are completely cool.
Use Good Cocoa Powder
A good-quality cocoa powder can make a noticeable difference in chocolate flavor.
Melt White Chocolate Slowly
White chocolate can seize or burn easily.
Use short microwave intervals and stir frequently.
Keep the Ghosts Simple
You don’t need perfect piping skills.
Simple ghost shapes can look even cuter because each one has its own personality.
How to Make Extra Fudgy Ghost Brownies
For extra-fudgy Ghost Brownies, there are a few small adjustments you can make.
Use slightly less flour and avoid overbaking.
Adding melted chocolate or extra chocolate chips can also increase the richness.
Another helpful tip is to allow the brownies to cool completely before cutting.
Some brownies become even fudgier after resting for several hours.
For the richest texture, store the cooled brownies in an airtight container overnight and decorate them the next day.
How to Cut Clean Brownie Squares
Clean cuts can make your Halloween brownies look much more polished.
After the brownies have cooled, chill them in the refrigerator for about 30 minutes.
Use a sharp knife.
Wipe the knife clean between cuts.
You can cut the brownies into:
- 9 large squares
- 12 medium squares
- 16 smaller party-size squares
Small squares are especially useful for Halloween parties because guests can easily grab one.
Fun Ghost Brownies Variations
There are many ways to customize these Halloween brownies.
Peanut Butter Ghost Brownies
Swirl creamy peanut butter into the brownie batter before baking.
The salty peanut butter balances the rich chocolate.
Mint Ghost Brownies
Add a little peppermint extract to the brownie batter.
You can also add crushed peppermint candy on top.
Double Chocolate Ghost Brownies
Add chocolate chips and chunks of dark chocolate to the batter.
This creates an extra-rich chocolate center.
White Chocolate Ghost Brownies
Add white chocolate chips directly into the brownie batter before baking.
Then decorate the finished brownies with additional white chocolate ghosts.
Caramel Ghost Brownies
Drizzle caramel sauce over the brownie surface before adding the ghosts.
The combination of caramel and chocolate is especially delicious.
Orange Halloween Brownies
Add a little orange zest to the brownie batter.
Orange and chocolate create a classic flavor combination that’s perfect for Halloween.
Halloween Party Ideas for Ghost Brownies
These Ghost Brownies are perfect for Halloween parties.
Arrange them on a large serving tray with the ghost decorations facing upward.
For an extra festive presentation, surround the brownies with:
- Halloween candy
- Mini pumpkins
- Candy corn
- Chocolate-covered pretzels
- Orange and black sprinkles
You can also place each brownie into a small Halloween cupcake liner.
This makes them easier to serve and keeps the chocolate topping from touching other desserts.
Can Kids Help Make Ghost Brownies?
Absolutely.
This recipe is especially fun for children because the decoration doesn’t have to be perfect.
Kids can help:
- Mix the brownie batter
- Pour the batter into the pan
- Pipe white chocolate ghosts
- Add chocolate eyes
- Create different facial expressions
- Arrange the finished brownies
For younger children, an adult should handle the oven and hot melted chocolate.
How to Store Ghost Brownies
Store Ghost Brownies in an airtight container at room temperature if the decorations do not contain ingredients that require refrigeration.
Place parchment paper between layers if you’re stacking the brownies.
They can generally stay fresh for several days when properly covered.
If your ghost topping contains cream cheese frosting or another perishable ingredient, refrigerate the brownies instead.
Bring them back toward room temperature before serving for the best brownie texture.
Can You Freeze Ghost Brownies?
Yes, but for the best results, freeze the brownie base before decorating.
Bake and cool the brownies completely.
Wrap them tightly in plastic wrap and place them inside a freezer-safe container or bag.
Freeze for up to several months for the best quality.
Thaw them in the refrigerator or at room temperature.
Once thawed, add the fresh ghost decorations.
This makes it much easier to prepare the brownies ahead of Halloween parties.
Make-Ahead Instructions
These Ghost Brownies are excellent for making ahead.
You can bake the brownies one or two days before serving.
Store them tightly covered.
Prepare the ghost decorations separately.
On the day of your event, decorate the brownies and arrange them on a serving platter.
This approach makes party preparation easier because you don’t have to bake and decorate everything at the same time.
Common Mistakes to Avoid
Overbaking
Overbaked brownies become dry and less fudgy.
Decorating While Warm
Wait until the brownies are completely cool.
Making the Chocolate Too Hot
Overheated white chocolate can become thick and difficult to pipe.
Cutting Before Cooling
Warm brownies often fall apart when sliced.
Making the Ghosts Too Large
Small ghost decorations usually look better on individual brownie squares.
Adding Too Much Decoration
Keep the brownie visible so the contrast between dark chocolate and white ghosts stands out.
What to Serve With Ghost Brownies
These brownies pair well with other Halloween treats and drinks.
Serve them with:
- Hot chocolate
- Coffee
- Vanilla ice cream
- Whipped cream
- Caramel sauce
- Pumpkin spice drinks
- Cold milk
For a Halloween dessert table, combine them with cookies, cupcakes, popcorn, candy, and seasonal fruit.
For another festive fall dessert, try our Fall Dessert Pumpkin Pie Tacos.
Frequently Asked Questions
Can I use boxed brownie mix?
Yes. A boxed brownie mix can save time if you’re mainly interested in the Halloween decoration.
Bake the brownies according to the package directions, cool completely, and then decorate them with ghost shapes.
Can I make the ghost shapes with icing?
Yes. Thick vanilla icing works very well.
Can I use marshmallows for the ghosts?
Yes. Marshmallows are a quick option, especially when baking with children.
How do I make black ghost eyes?
Melted dark chocolate or black decorating gel works well.
Can I make these brownies gluten-free?
Yes. Use a suitable gluten-free flour blend designed for brownies.
Can I make them dairy-free?
Yes. Use dairy-free butter and dairy-free white chocolate.
Can I use milk chocolate instead of dark chocolate?
Absolutely. The flavor will be sweeter and milder.
How far ahead can I make Ghost Brownies?
You can bake the brownies a day or two ahead and decorate them shortly before serving.
Why did my brownies turn out dry?
They were likely overbaked or had too much flour.
Bake until the center is set but still slightly soft.
Why did my white chocolate become thick?
White chocolate can seize if it gets too hot or comes into contact with moisture.
Melt it slowly and stir frequently.
How to Make Ghost Brownies Look Professional
You don’t need complicated decorating equipment to create beautiful Ghost Brownies.
The biggest visual advantage comes from contrast.
The dark chocolate brownie base creates a perfect background for bright white ghost decorations.
Use a clean piping bag and make the ghost shapes approximately the same size.
Add tiny, evenly spaced chocolate eyes.
You can also dust the finished brownies lightly with powdered sugar before adding the ghosts.
For an extra Halloween effect, add a few orange or black sprinkles around the edges of the serving platter.
Why These Ghost Brownies Are Perfect for Halloween
Halloween desserts don’t have to be complicated to be memorable.
These Ghost Brownies combine a familiar chocolate dessert with a simple decoration that immediately gives them a spooky seasonal appearance.
The recipe is easy enough for beginners while still being attractive enough for parties and gatherings.
Because the brownie base can be prepared ahead of time, they’re also practical when you’re making several Halloween desserts at once.
Most importantly, they’re fun.
Whether you make perfectly identical ghosts or give every brownie a different expression, the finished dessert will have plenty of personality.
Final Thoughts
These Ghost Brownies are a fun and delicious way to celebrate Halloween with a homemade dessert that doesn’t require complicated decorating skills.
The brownies are rich, chocolatey, and fudgy, while the white chocolate ghost decorations add a playful contrast that makes them perfect for the season. You can keep the design simple with tiny eyes and mouths, or get creative with different ghost expressions and colorful Halloween decorations.
One of the best things about this recipe is how flexible it can be. You can prepare the brownies in advance, freeze the undecorated base, change the chocolate flavor, add peanut butter or caramel, or turn the whole recipe into a fun baking project with your family.
They’re also easy to serve. Cut them into small squares, place them on a Halloween-themed platter, and let everyone choose their favorite ghost. For parties, you can even wrap individual brownies in clear bags with Halloween ribbons to create cute homemade treats for guests to take home.
The combination of fudgy chocolate and sweet white chocolate makes every bite satisfying, while the simple decoration turns an everyday brownie into something special.
Whether you’re preparing treats for a Halloween party, school event, movie night, or simply want to bake something festive during October, these brownies are a great choice.
Bake the brownies until they’re just set, let them cool completely, decorate the ghosts carefully, and enjoy them with your favorite warm drink or a scoop of vanilla ice cream.
Sometimes the best holiday desserts are the simplest ones. A good brownie, a little melted white chocolate, and a few tiny chocolate eyes are all you need to create a tray of adorable Halloween treats that both kids and adults will love.