
Introduction to Pumpkin Patch Dirt Cups
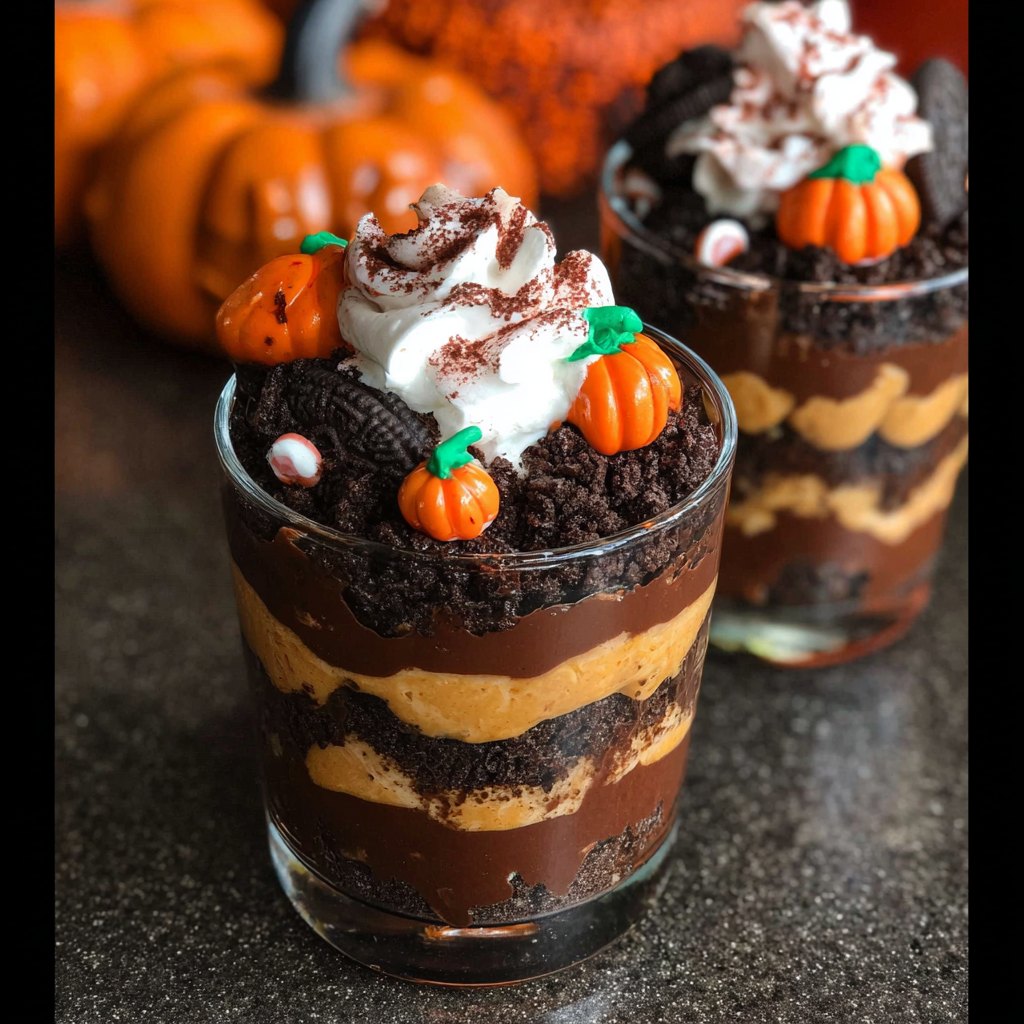
If you’re searching for the perfect fall treat that’s kid-friendly, no-bake, and totally adorable — Pumpkin Patch Dirt Cups are your answer! These whimsical desserts are as fun to make as they are to eat, layered with chocolate pudding, crushed Oreos, and topped with candy pumpkins to create an edible autumn patch.
Whether you’re planning a Halloween party, a Thanksgiving kids table, or just want a fun afternoon activity, this easy dessert will win everyone’s heart.Try also this Pumpkin Carbonara
In fact, if you’re wondering how nutritional these cookie crumbs are, you can check out Oreo Crumbs Nutrition Info for a breakdown. And if you’re making these for little ones during a party or classroom event, be sure to review FDA Halloween Food Safety Tips for helpful hygiene guidelines.
🍂 What Are Pumpkin Patch Dirt Cups?
Pumpkin Patch Dirt Cups are a fall-themed version of the classic dirt pudding dessert. Traditionally made with chocolate pudding, Oreo crumbs, and gummy worms, this version trades the worms for cute candy pumpkins to give it a harvest-ready look.
They’re:
- No-bake
- Single-serve (great for portion control)
- A kid-favorite during the spooky season
- Highly customizable
🧁 Ingredients You’ll Need for Pumpkin Patch Dirt Cups
Making Pumpkin Patch Dirt Cups is simple, fun, and super customizable. Below is a detailed breakdown of all the ingredients you’ll need — plus substitutions to fit dietary preferences and creative variations. Whether you’re prepping for a classroom Halloween party or a cozy fall gathering at home, this ingredient list has you covered.
🧾 Main Ingredients (Basic Recipe)
- 1 package of Oreo cookies – Crushed finely to resemble dirt. You can also use any chocolate sandwich cookies.
- 1 box of instant chocolate pudding mix (3.9 oz) – You’ll need one standard box. Choose sugar-free or vegan varieties if needed.
- 2 cups of cold milk – For mixing the pudding. Use dairy-free alternatives like almond or oat milk if desired (check pudding instructions for compatibility).
- 1 container of whipped topping (8 oz, e.g., Cool Whip) – For folding into the pudding mixture. Coconut whipped topping works for a dairy-free version.
- Candy pumpkins – The signature decoration! We recommend Brach’s Mellowcreme Pumpkins for their size and color.
- Clear cups or jars – Use small plastic cups, glass dessert jars, or even mini flower pots for a cute presentation.
🍬 Optional Add-Ons for Theming
- Green-tinted coconut flakes – Dye sweetened coconut green to mimic grass around the pumpkins.
- Green sprinkles or sanding sugar – An easier, less messy alternative to coconut.
- Gummy worms or gummy bugs – For a classic “dirt cup” look with a Halloween twist.
- Pumpkin spice seasoning – Mix into the pudding for a fall flavor boost.
- Orange food coloring – Add to vanilla pudding to mimic pumpkin hues.
- Mini chocolate chips – Sprinkle into the pudding for added texture and richness.
- Cream cheese – Mix with the pudding to create a cheesecake-style base.
♻️ Allergy-Friendly Substitutions
- Use gluten-free cookies instead of Oreos.
- Choose plant-based pudding mixes with almond or soy milk.
- Substitute vegan whipped topping (like So Delicious CocoWhip).
- Ensure your candy pumpkins are free of gelatin if serving vegans.
🛒 Where to Buy
You can find all of these ingredients at major grocery chains, or order online for convenience. Be sure to check seasonal aisles for fall-themed candies and sprinkles.
🛍️ Pro tip: Want to go vegan or gluten-free? Use plant-based pudding, coconut whipped topping, and gluten-free cookies.
🧰 Tools You’ll Need
- Mixing bowls
- Electric mixer or whisk
- Food processor or zip bag + rolling pin (for crushing cookies)
- Clear plastic cups, mini jars, or party cups
- Spoons or piping bag for easy layering
🧒 How Kids Can Help
One of the best things about making Pumpkin Patch Dirt Cups is that it’s a fun, hands-on activity that kids of all ages can enjoy. This no-bake recipe is not only safe for little helpers, but also a great opportunity to teach basic kitchen skills and spark creativity.
Here’s how kids can get involved at every step:
👶 Toddlers (Ages 2–4)
- Crush the cookies in a zip-top bag using a rolling pin — they’ll love the smashing!
- Drop candy pumpkins on top of the cups.
- Sprinkle green coconut flakes or Halloween sprinkles like confetti.
👧 Younger Kids (Ages 5–8)
- Stir the pudding mix with milk using a whisk.
- Layer the dirt cups with pudding and cookie crumbs using a spoon.
- Help arrange decorations like gummy worms or tiny flags.
🧑🍳 Older Kids (Ages 9+)
- Use a measuring cup to prep ingredients.
- Fold whipped topping into pudding gently with a spatula.
- Create themed signage (like “Pumpkin Patch”) using craft supplies.
Involving kids not only makes the process more fun but helps them build confidence in the kitchen.
📋 Step-by-Step Instructions
Creating Pumpkin Patch Dirt Cups is incredibly fun and beginner-friendly. This no-bake dessert can be whipped up in under 30 minutes, making it a perfect last-minute Halloween treat or kid-friendly fall snack. Below is a detailed step-by-step guide to help you layer and decorate like a pro.
🥄 1. Crush the Cookies
- Place an entire package of Oreo cookies into a food processor.
- Pulse until they become a fine crumb texture, like garden soil.
- No processor? No problem! Put cookies in a zip-top bag and crush with a rolling pin.
- Set aside about 1/4 cup of crumbs for topping later.
Tip: You can also use chocolate graham crackers or gluten-free sandwich cookies as a substitute.
🍫 2. Prepare the Chocolate Pudding
- In a large mixing bowl, combine:
- 1 package of instant chocolate pudding mix
- 2 cups of cold milk
- Whisk for 2 minutes until the mixture thickens and becomes smooth.
- Let it sit for 5 minutes to set properly.
Want extra flavor? Add a dash of pumpkin spice or cinnamon to the mix.
🍦 3. Fold in the Whipped Topping
- Gently fold in one full tub (8 oz) of whipped topping into the pudding.
- Use a spatula to avoid over-mixing, keeping the texture light and fluffy.
- This forms a mousse-like base that’s rich and creamy.
You can also mix in a few mini chocolate chips or crushed cookies for texture.
🧁 4. Layer the Dirt Cups
- In each clear cup or mini mason jar:
- Add 1–2 tablespoons of crushed cookies at the bottom.
- Spoon in a layer of pudding mixture.
- Add another layer of cookie crumbs.
- Repeat layers until the cup is nearly full, ending with cookie “dirt” on top.
🎃 5. Decorate Your Pumpkin Patch
- Top with candy pumpkins by gently pressing them into the cookie topping.
- Sprinkle with green coconut flakes or green sanding sugar to simulate grass.
- Optionally add gummy worms, candy eyes, or themed toothpick toppers.
For extra cuteness, make a tiny “Pumpkin Patch” sign with craft paper and a toothpick!
These adorable treats are now ready to chill or serve right away. Want to elevate them for a party? Display them in a tray of candy corn “dirt” or wrap each cup in Halloween-themed ribbon!
🍽️ Serving & Display Ideas
Presentation is everything—especially when you’re serving Pumpkin Patch Dirt Cups at a fall festival, classroom party, or Halloween gathering. These little cups of edible fun are cute on their own, but with a few creative touches, you can turn them into a show-stopping centerpiece.
Here are some fun and festive ways to serve and display them:
🎃 Cup Options
- Clear plastic party cups – Affordable and great for showing off the layers.
- Mini mason jars – Perfect for rustic fall themes or farm parties.
- Mini flower pots – Line with food-safe plastic wrap for a realistic “garden” look.
🍁 Serving Presentation
- Tiered dessert stands – Elevate your treats (literally!) by stacking them at different levels.
- Hay bale display – Use a small straw bale or wooden crate for a farmer’s market vibe.
- Dessert tray with fall leaves or candy corn – Place the cups in a tray lined with decorative leaves, candy corn, or edible moss for extra flair.
🏷️ Decorative Touches
- Add miniature pumpkin patch signs made from toothpicks and paper.
- Tie fall ribbon around each cup for an elegant touch.
- Label each cup with guest names as a fun edible place card.
By taking a few extra steps, your Pumpkin Patch Dirt Cups will not only taste amazing — they’ll become a conversation piece at your fall event!
Print
Pumpkin Patch Dirt Cups
- Total Time: 15 minutes
- Yield: 6–8 servings 1x
- Diet: Vegetarian
Description
These Pumpkin Patch Dirt Cups are a fun, no-bake fall dessert layered with chocolate pudding, crushed Oreos, and topped with candy pumpkins. Easy, festive, and kid-approved!
Ingredients
-
1 box (3.9 oz) instant chocolate pudding mix
-
2 cups cold milk
-
1 container (8 oz) whipped topping (Cool Whip), thawed
-
15 Oreo cookies, crushed
-
Candy pumpkins (e.g., Brach’s Mellowcreme)
-
Green frosting or green sprinkles (optional, for vines/leaves)
-
6–8 clear plastic cups or dessert jars
Instructions
-
In a bowl, whisk together chocolate pudding mix and cold milk. Let set for 5 minutes.
-
Fold in the whipped topping until fully combined.
-
In each cup, layer a spoonful of crushed Oreos at the bottom.
-
Add a layer of pudding mixture.
-
Top with more crushed Oreos to resemble “dirt.”
-
Place 2–3 candy pumpkins on top of each cup.
-
(Optional) Pipe green frosting to look like vines/leaves.
-
Chill for 15–30 minutes before serving.
Notes
-
You can substitute crushed chocolate graham crackers for Oreos.
-
Make ahead and refrigerate for up to 24 hours.
-
Add gummy worms for extra fun!
-
Use homemade pudding if preferred.
- Prep Time: 15 minutes
- Cook Time: 0 minutes (no-bake)
- Category: No-Bake
- Method: Baking
- Cuisine: American
Nutrition
- Calories: 220–250
- Sugar: 24g
- Sodium: 180mg
- Fat: 9g
- Saturated Fat: 3.5g
- Carbohydrates: 36g
- Fiber: 1g
- Protein: 2g
- Cholesterol: 5mg
🧠 Fun Variations to Try
Want to put your own twist on it? Try these creative spins:
- Use pumpkin spice pudding instead of chocolate.
- Add orange food coloring to vanilla pudding for a more festive look.
- Layer in cream cheese frosting or cheesecake mousse.
- Make it spooky by adding chocolate bones or candy ghosts.
❄️ Make-Ahead & Storage Tips
- These cups can be made up to 24 hours in advance.
- Store in the fridge, covered, to prevent drying.
- Do not freeze – the texture won’t hold well after thawing.
Tip: Add the candy pumpkins just before serving so they don’t get soggy.
🚫 Common Mistakes to Avoid
- Over-mixing the pudding — it will lose fluffiness.
- Skipping chilling time — gives best texture and flavor.
- Serving too warm — cold pudding holds better structure.
🧠 Pumpkin Patch Dirt Cups FAQs
❓ Can I make dirt cups the night before?
Yes! You can prep them the night before and keep them chilled in the fridge.
❓ What can I use instead of pudding?
Try chocolate mousse, cheesecake filling, or even yogurt for a healthier twist.
❓ Are these gluten-free?
Not by default. Use gluten-free cookies and double-check your pudding mix.
❓ Can I make them vegan?
Absolutely! Use dairy-free pudding and coconut whipped topping.
❓ Where can I find candy pumpkins?
Most grocery stores carry them in fall. You can also get them from Brach’s Mellowcreme Pumpkins.
🧠 Why Moms and Party Planners Love This Recipe
Pumpkin Patch Dirt Cups check all the boxes:
- ✅ Budget-friendly
- ✅ Kid-approved
- ✅ Make-ahead convenience
- ✅ Creative & Instagram-worthy
Whether you’re a busy parent or throwing a Pinterest-worthy fall bash, this dessert fits right in.
🧡 Final Thoughts Of Pumpkin Patch Dirt Cups
These Pumpkin Patch Dirt Cups are proof that simple ingredients can create magical, memorable moments. The blend of creamy pudding, crunchy “dirt”, and adorable pumpkins brings fall straight to your dessert table.Discover How to Crush Oreos Without a Food Processor
So grab your Oreos, whip up that pudding, and get ready to plant your own edible pumpkin patch.