
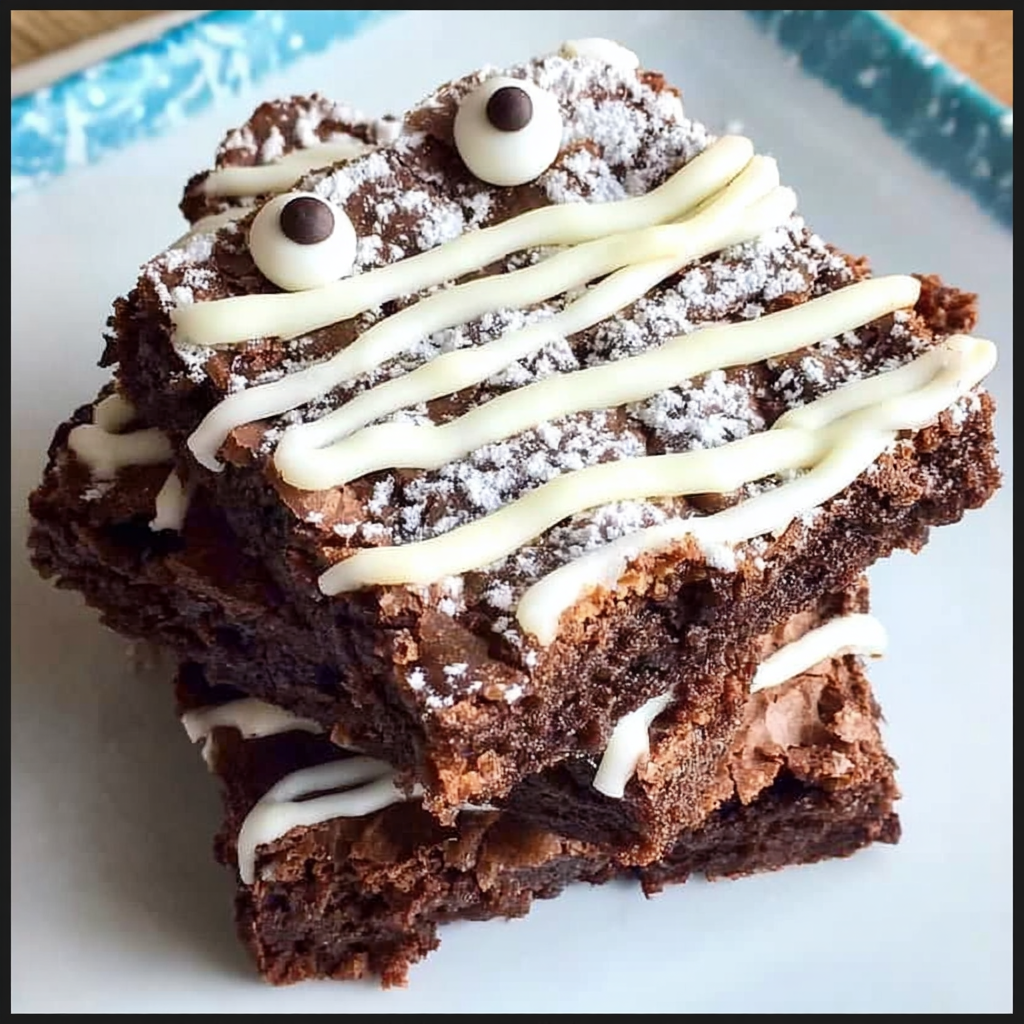
Looking for a fun, festive, and spooky dessert for Halloween? Mummy Brownies are the perfect choice. These adorable treats take a rich, fudgy brownie base and transform it into a Halloween masterpiece with white “bandages” and candy eyeballs. They’re easy enough for kids to help decorate, but impressive enough to wow guests at parties or bake sales.
Unlike other complicated desserts, mummy brownies balance simplicity and creativity. Whether you use a boxed mix or make them from scratch, the decorating process is quick and leaves plenty of room for personalization. Best of all, these brownies are deliciously fudgy on the inside and eye-catching on the outside. try also this Red Velvet Brownies
In fact, food safety experts even remind bakers that if you use frostings like cream cheese, these treats need refrigeration and shouldn’t be left out for more than 2 hours at parties (Halloween food safety tips for parties). That’s a handy guideline when serving kids and adults alike. And when melting chocolate for those iconic zig-zag wraps, baking authorities like King Arthur suggest tried-and-true methods for how to melt chocolate without scorching in the microwave or on a double boiler (how to melt chocolate without scorching).
What Are Mummy Brownies?
Mummy Brownies are brownies decorated to resemble mummies. The effect is achieved by:
A fudgy brownie base — homemade or boxed mix.
White chocolate or candy melts drizzled in zig-zag lines to mimic bandages.
Candy eyes placed on top for the spooky-cute look.
These Halloween brownies are both novelty and indulgence, making them a go-to recipe during the spooky season.
Ingredient Snapshot
When it comes to mummy brownies, you don’t need a long shopping list—just the right mix of classic brownie ingredients and fun decorations. The beauty of this recipe is that you can make it from scratch for a richer, homemade flavor, or save time by starting with a boxed brownie mix. Both approaches work perfectly and give you a delicious base to transform into spooky-cute mummies.
🟠 From-Scratch Brownies
If you love the taste of homemade, here are the essentials:
Butter – melted for that fudgy texture.
Granulated sugar & brown sugar – the combo adds sweetness and moisture.
Cocoa powder & melted chocolate – for deep chocolate flavor and a dark base that makes the mummy wraps pop.
Eggs – add structure while keeping the brownies dense and chewy.
All-purpose flour – used sparingly for a fudgy consistency (too much flour makes brownies cakey).
Vanilla extract & salt – balance and enhance the chocolate flavors.
💡 Optional mix-ins include chocolate chunks, espresso powder (to intensify cocoa flavor), or black cocoa powder for a dramatic, darker brownie that looks extra spooky under the white drizzle.
🟠 Boxed Mix Shortcut
If time is tight, a fudge-style boxed brownie mix is your best friend. Simply follow the package directions with oil, water, and eggs. The result is a chewy, chocolatey canvas that’s ready for decorating. A boxed mix is especially handy if you’re baking with kids or making a large batch for Halloween parties or school events.
🟠 The “Mummy Wraps”
This is where the brownies transform into Halloween showstoppers:
White chocolate – melts smoothly with a creamy, sweet finish, but can be tricky to temper.
Candy melts – easier to handle since they don’t require tempering, and they set quickly for neat zig-zag drizzles.
Optional gel coloring – tint the drizzle orange, green, or purple for a fun twist.
🟠 Candy Eyes
No mummy is complete without its signature eyes! You can buy ready-made candy eyeballs at most baking stores, or make them yourself with icing. For allergy-friendly versions, vegan eyes are available, or you can pipe dots of royal icing topped with chocolate pupils.
Tip: Learn more about what real white chocolate contains to better understand flavor vs. ease (what real white chocolate contains).
Tools & Equipment
To create neat mummy brownies, you’ll need:
8×8 or 9×13 baking pan
Parchment paper (for easy lift and cutting)
Mixing bowls, spatula, whisk
Microwave-safe bowl or double boiler for melting
Piping bag or zip-top bag for drizzling
Step-by-Step: From-Scratch Brownie Base
Making mummy brownies from scratch gives you the richest flavor and the fudgiest texture. Follow these detailed steps to create a perfect brownie base before decorating your spooky treats.
🟠 Step 1: Prepare the Pan
Line an 8×8 or 9×13 baking pan with parchment paper, leaving an overhang to lift brownies out easily. Lightly grease the paper for extra insurance against sticking. Preheat your oven to 350°F (175°C) so it’s ready when your batter is mixed.
🟠 Step 2: Melt the Chocolate & Butter
In a microwave-safe bowl or using a double boiler, melt unsalted butter with chopped dark or semisweet chocolate. Stir frequently until smooth and glossy. This forms the rich, chocolaty backbone of your brownies.
🟠 Step 3: Add Sugars & Eggs
Whisk in granulated sugar and brown sugar while the mixture is still warm—this helps create the classic shiny, crinkle top. Next, add eggs one at a time, whisking well after each addition. The eggs bind the batter and build that irresistible fudgy texture. Finish with a splash of vanilla extract for depth.
🟠 Step 4: Fold in Dry Ingredients
In a separate bowl, whisk together all-purpose flour, cocoa powder, and salt. Gently fold the dry ingredients into the wet mixture using a spatula. Avoid overmixing—stir until just combined. This ensures your brownies stay dense, not cakey.
🟠 Step 5: Bake to Perfection
Pour the batter into your prepared pan and smooth the top. Bake for 25–35 minutes, depending on pan size, until the edges are set and a toothpick inserted in the center comes out with moist crumbs (not dry).
🟠 Step 6: Cool Completely
Allow brownies to cool fully on a wire rack before cutting. This prevents crumbling and ensures clean slices for decorating your mummy brownies.
Make the “Mummy Wraps”
Melt candy melts or white chocolate carefully.
Pour into piping bag or zip-top bag.
Drizzle in zig-zag motions to mimic mummy bandages.
Let set for a few minutes.
Add the Eyes
Place two candy eyes while drizzle is tacky.
Vary placement for fun, quirky expressions.
For DIY eyes: pipe white icing dots, then add smaller dark dots for pupils.
Mummy Brownies
- Total Time: 35 minutes
- Yield: 12 brownies 1x
- Diet: Vegetarian
Description
Spooky and fun Halloween brownies decorated like mummies with candy eyes and white chocolate drizzle. A quick and easy festive dessert kids and adults love!
Ingredients
-
1 box brownie mix (or homemade brownies)
-
Eggs, oil, and water (as directed on brownie mix)
-
1 cup white chocolate chips (for mummy bandages)
-
Candy eyeballs
Instructions
-
Preheat oven according to brownie mix directions.
-
Prepare and bake brownies in a pan; let cool completely.
-
Cut brownies into rectangles or squares.
-
Melt white chocolate chips until smooth.
-
Drizzle melted chocolate over brownies in zig-zag lines to resemble mummy bandages.
-
Place candy eyes on each brownie before the chocolate sets.
-
Let chocolate harden and serve.
Notes
-
Use store-bought brownies for an even faster version.
-
Add food coloring to drizzle for a spooky twist.
-
Store in an airtight container for up to 3 days.
- Prep Time: 10 minutes
- Cook Time: 25 minutes
- Category: Dessert, Holiday Treats
- Method: Baking
- Cuisine: American
Nutrition
- Calories: 230
- Sugar: 22g
- Sodium: 120mg
- Fat: 11g
- Saturated Fat: 4g
- Carbohydrates: 32g
- Fiber: 1g
- Protein: 2g
- Cholesterol: 20mg
Flavor & Shape Variations
Use black cocoa for ultra-dark brownies.
Add peppermint extract to white drizzle.
Tint drizzle with orange gel coloring.
Shape with cookie cutters into circles or rectangles.
Gluten-free or dairy-free swaps available (GF flour blends, vegan chocolate, homemade vegan eyes).
Storage & Freezing
Undecorated brownies: store airtight at room temp up to 4 days.
Decorated with perishable frosting: refrigerate, serve within 2 days.
Freeze uncut slabs wrapped in foil, then thaw and decorate before serving.
Troubleshooting
Dry brownies → Overbaked; pull when moist crumbs cling.
Runny drizzle → Chocolate overheated; stir often and avoid water.
Seized chocolate → Add a touch of fat (coconut oil, butter).
Sliding eyes → Wait 1–2 minutes after drizzle before pressing on.
Food Safety & Allergens
Contains eggs, dairy, gluten (unless adapted).
If using cream cheese frosting, refrigerate promptly.
For parties, label allergen content.
Offer teal pumpkin project options for allergy-friendly treats.
Serving & Styling Ideas for Mummy Brownies
Serve on a Halloween dessert board.
Add themed sprinkles or edible glitter.
Wrap individually for classroom parties.
Mix with other Halloween brownies, cupcakes, and cookies for variety.
Nutrition Snapshot
Typical 2×2-inch brownie with drizzle:
Calories: 220–280
Fat: 11–13 g
Carbs: 28–32 g
Protein: 2–3 g
(Varies by recipe and toppings.)
FAQs About Mummy Brownies
- Can I make mummy brownies with a box mix?
Yes! They’re quick and convenient; just decorate once cooled. - What’s better for wraps: white chocolate or candy melts?
Candy melts are easier; white chocolate is richer but trickier. - How do I drizzle without a piping bag?
Use a zip-top bag, snip the corner, and pipe. - Can I make them gluten-free/dairy-free?
Yes—use GF flour blends and vegan chocolate/candy eyes. - How long do they last?
Undecorated: 3–4 days at room temp. Decorated with perishable frosting: refrigerate and consume within 2 days. - Do I cut before or after decorating?
Cut first, then drizzle and decorate for neat edges. - Can the drizzle be tinted?
Yes—use gel-based food coloring for vibrant colors.
Conclusion Of Mummy Brownies
Mummy Brownies are the ultimate combination of festive design and indulgent flavor. With their gooey centers, spooky “bandages,” and silly eyes, they bring Halloween spirit to any table. Whether you’re a busy parent looking for a quick win or a baker who loves experimenting, this recipe adapts to your needs. Decorate them with your kids, pack them for parties, or serve them as the centerpiece of your Halloween spread—they’re sure to disappear fast. Discover Brownie Base Reference